|
|
|
Introduction - Creating Image Based Lighting |
|
|
The RenderMan Artist Tools allow you to easily incorporate image based lighting techniques into your
Maya scenes. Image based lighting entails using environment maps as a source of
illumination for objects. In this method scene lighting is defined by
an environment map, which can be a high dynamic range image, HDRI. Through image based
lighting, realistic lighting can be quickly integrated into a scene, be it dusk, dawn, noon or night.
Here we'll cover the workflow involved in setting up image based lighting with Slim. For more information about image based lighting in general, you'll find a trove of info out on the web. |
|
Using IBI1 - Open the Tutorial Scene |
|
|
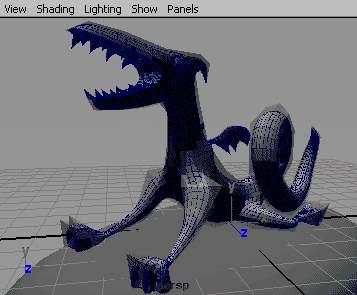
For this tutorial, open the scene: This scene contains a model of a dragon perched upon a rock. We'll light the dragon using image based lighting techniques in conjunction with Slim. By the end of this lesson you should have an understanding of how to create image based lighting effects with Slim. Hint: To see
the subdiv visualization in Maya, you may want to select the dragon and toggle
object x-ray:
|
|
|
2 - A Preliminary Render |
|
|
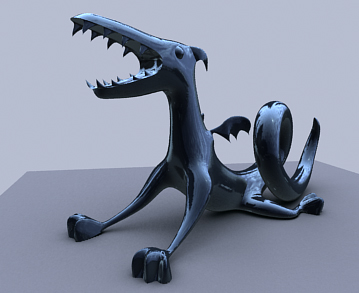
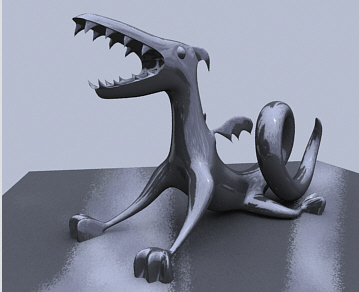
Select the persp window and Render the scene from MTOR: RenderMan-> Render Your image should look like the "before" image on the right. There are no scene lights, so the geometry is black. The back ground color is set to blue. To illuminate this scene we'll use an environment texture, plugged into an environment light. All illumination will come from an image map. This is what image based illumination is all about. |
|
|
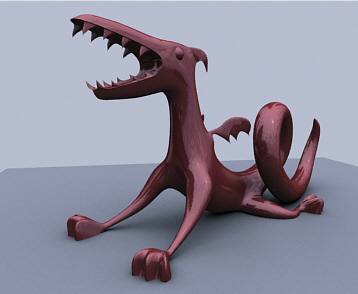
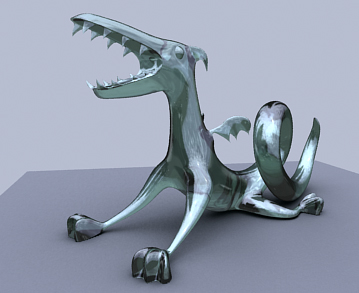
Here's a look at the final "after" image, created without any scenes
lights. By adjusting surface parameters many different types of surfaces
can be represented, from shiny metals, to glass, to dull clay objects.
So let's get started. |
|
|
3 - Create an Environment Light & Shaders |
|
|
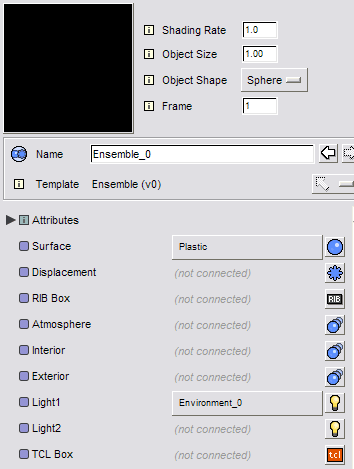
Now we'll create a setup for image based lighting: 1)
First we'll start by creating an ensemble. From the palette perform the
following operation: Open the Ensemble by double clicking it in the palette. 2) Attach an Environment light, by clicking on one of the light connections and selecting "Environment." The environment light's environment map will be used for the image based lighting. (The environment map could be be named "world" and it would affect the entire scene. The environment can be attached directly to objects or plugged into an ensemble to affect specific surfaces. For this example we're attach our environment light to a ensemble.) 3) The third step entails creating a shading model that knows how to generate image based lighting effects from an environment map. Fortunately for us, all of Slim's out-of-box shading models know how to do this. Select the shading model connection and pick "Plastic." Your ensemble should look like the image on the right.
|
|
|
4 - Load in the Environment Map |
|
|
The most crucial step when using image based lighting is selecting a suitable environment map.
You can use an HDR image or a normal image for an environment. In this
case we'll use a normal environment map.
1) Choose
an "Environment Map" by opening the file picker ( Next we must convert the texture. From the texture menu ( Alternatively, you may use an HDR image. Load in the HDR image and convert
it, but add the "-float" flag to create a floating point tiff which
will preserve the high dynamic range information. It's like the above with the
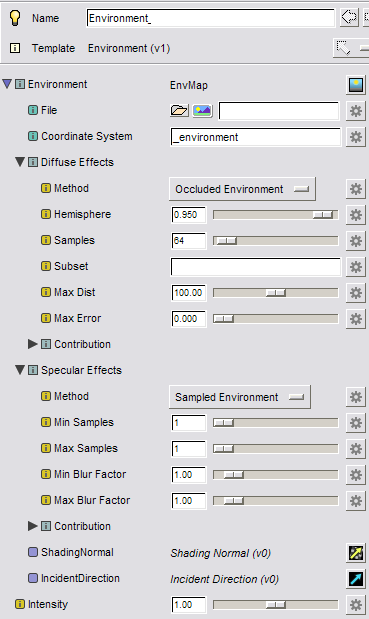
following addition: 2) Next you'll notice that by default an environment light is setup to cast reflections, specular effects. Diffuse effects are disabled by default. We must enable them: Diffuse Effects -> Method -> "Occluded Environment" The occluded environment will create nice soft shadows based on scene geometry while combining illumination from the environment map. 3) Next we'll change the way that Specular Effects are generated. By default it is a simple blurry lookup of the map from the surface. We can get higher fidelty by sampling the environment: Specular Effects -> Method -> "Sampled Environment" |
|
|
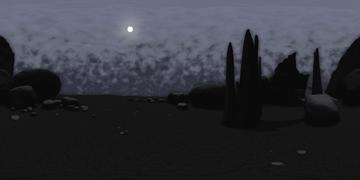
On the right is the image we're using for the environment map. It's not an HDRI, just an ordinary image. Alternatively we could use an HDR image. It doesn't matter. |
|
|
5 - Image Based Lighting Controls |
|
|
Now attach the Ensemble we made in the previous step and render the scene. You
should get something like the image on the right. Remember we need ray tracing
enabled to render these effects . . . make sure that Ray Tracing is enabled in
your RenderMan Globals.
Now depending on what kind of material we want to create, we must adjust the parameters. The most important parameter the "Samples" parameter listed under the "Diffuse Effects" collection in the environment light setting. Low settings (64) will be faster but will be spotty. Higher settings (1024) will be much higher quality but take longer to render. |
|
|
|
|
|
6 - Adjusting IBI |
|
|
By adjusting the specular and diffuse parameters we can create different kinds
of materials, just as we normally do when creating shaders. You'll find that
Slim's support for image based illumination is very general, allowing you to
create many different types of looks with a high degree of control.
In the image on the right, we've added a matte shader to the floor by turning it's specularity to zero. For the dragon, we've created another shader which is shiny red. |
|
| A metal look is created by lowering the diffuse value to "0.25" The diffuse and specular coloring has been changed to blue. |
|
|
Here's an example showing how glass objects can be created with image based lighting. Slim's Glass shading model can get illumination from scene lights or environment lights. Conclusion Image based lighting can be used to create sophisticated lighting, without the use of any scene lights, soley through the use of environment maps. Slim's default shading models ready "out-of-box" for image based lighting. These effects can be used on their own or combined with traditional lighting techniques. |
|
Tips and tricks for working with IBINote A - Working with HDR Imagery |
|
|
First you'll want to convert your HDR image to a tiff texture, probably
the easiest way to do this is by using txmake, from the command
line: |
|
| txmake -format tiff -envlatl hdr_image.hdr hdr_image.tex | |
|
Alternatively,
you may convert an HDR image with Slim. Load in the HDR image and convert it
like normal, but add the "-float" flag to create a floating point tiff
which will preserve the high dynamic range information. It's like the above with
the following addition: |
|
|
Pixar Animation Studios
|