|
|
|
|
|
|
In this tutorial we will explain how to create caustics using PRMan 11's new ray
tracing tools and MTOR.
|
|
|
1 - Caustics: Getting Started |
|
|
The first step is to open a new Maya scene and create a simple
NURBS plane to act as our ground plane.
|
|
|
2 - The Next Step |
|
|
Next we can create a couple simple shapes like the ones illustrated in the this
image (reference 1). A sphere and another more complex shape would be perfect.
Next we need to add a light to the scene. For our primary light source we will use a spotlight which will emit photons for use in calculating the photon map required to create caustic effects. Note: lights must have the proper falloff. Spot and point lights must have squared falloff. Directional lights must have no falloff. This is because photons from a point or spot light naturally spread out so that their density have a quadratic fall-off, and photons from solar lights are parallel so they inherently have no fall-off. Create a Spotlight and translate the light 150
units in X.
|
|
|
3 - MTORSpotLight |
|
|
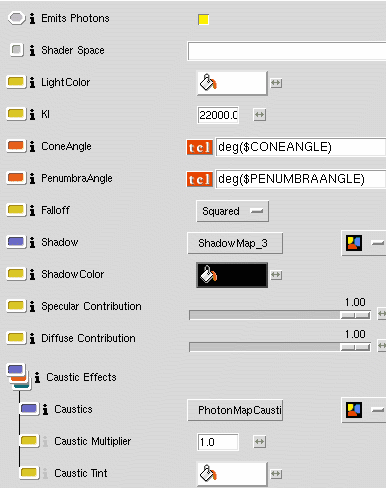
Next we must set up the MTORSpotLight shader for your spotlight. We will create two connections within this light. The first is for the Shadow and the second is for the Photon Map which will be used to create the caustic effects. Because we need to create a caustic map we must turn on the "emits photons" feature in the light. Set the Intensity to 25,000 (be sure you have translated the light 150 units in 'X'). Next, move down to the shadow feature and set the node to "connection". From the associated menu select "Shadows." |
|
|
4 - Shadow Map |
|
|
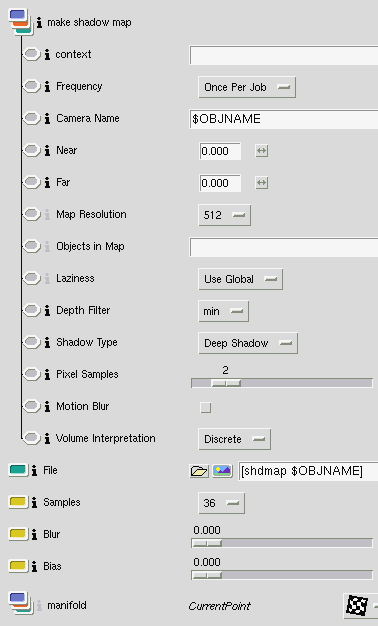
Click on the "Shadows" to open the "shadow map" node. Click on the "Make
Shadow Map" options which are by default collapsed. This expands to reveal the
shadow map generation settings.
First select the frequency with which you want the map generated. In some scenes the map will be the same from frame to frame so you only need to calculate the map once (as in this scene), in others where there is animation you may need to calculate a new shadow map for each frame. In the latter case you would select "every frame." Next we will select the name of the object used to create the shadow map, in this case it is the light itself so we input the string "$OBJNAME" which indicates that the shape node of the object to which the shader is attached will act as our camera for the creation of this map (usually the same light we attach the light appearance to). We can then set near and far clipping planes if desired, map resolution, depth filters, etc. In this instance we select 256 as the map resolution as deep shadows require far less resolution than standard shadow maps! There is another new feature in here that is worth noting called Volume Interpretation. Take a moment to read the information provided by clicking on the "i" icon next to the parameter. Just like previous versions of MTOR you can now "refer to shadow" and you are done with the shadow for this light. |
|
|
5 - Caustics |
|
|
Moving back to our Spotlight shader we now need to set up the caustic map for
the creation of the caustic effect.
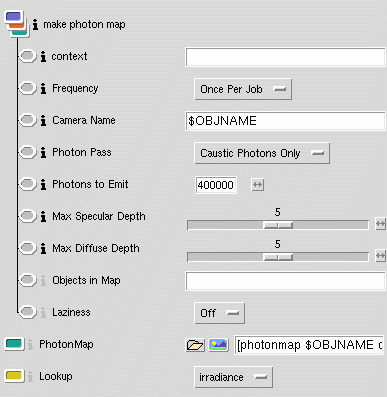
We select "Connection" for the "Caustic" and connect this to "PhotonMapCaustic" from the pull down menu. Within the "PhotonMapCaustic" node we have a set of options similar to a shadow map where we can set the frequency for map generation, the camera name (just like the shadow map) and a figure for the number of photons to emit. More photons mean higher render times. In this case we will set this up so that like the shadow we only calculate the map once per job, and 400,000 photons are emitted. In the "Photon Map" option we simply select 'refer to "Caustic Photon."' The spotlight is now set up generate deep shadows and caustic effects. |
|
|
6 - Add a directional light |
|
|
Next add a simple distance (directional) light to the scene and using the Maya
intensity attribute lower the light's intensity to 0.25. Since we are only
using this light for fill and we are not creating separate shadow maps for it (or
generating caustic effects) there is no reason to add an mtor shader to this
light as mtor will simply use the values provided by Maya. |
|
|
7 - Floor Ensemble |
|
|
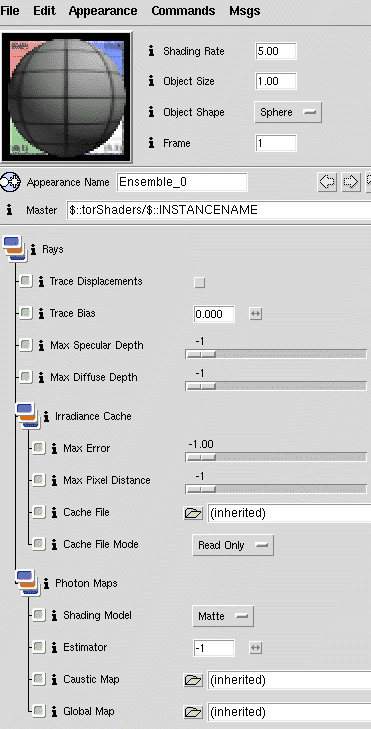
With ray tracing in PRMan we can control how and which surfaces in the scene are
traced on a per-object basis to dramatically accelerate calculation of the
final frame. The majority of the controls are provided in the "Ensemble"
template and this is a good place to start whenever you are creating a new
shader.
Next we need to create and attach a surface shader to the ground plane (a white grid in this case will highlight the caustic effect nicely). Start by creating a simple ensemble and connect the surface to a the blinn shading model which we will set up to use the supplied grid texture from the rat distribution in $RATTREE/lib/textures/). In the top level of the ensemble you will notice a collapsed menu for "Rays." This is used to set up the surface for ray tracing. In this case we simply need to tell the surface that it should as a matte surface to photons. We do this by selecting "Matte" from the 'Shading Model' menu in the Photon Map section.
|
|
|
8 - Glass Ensemble |
|
|
Next create another "Ensemble" which will be used for the glass surfaces.
In this ensemble we connect the surface to "Glass." In the glass shader you can set all the parameters to achieve the look you desire in your glass surface. Next, just like the ensemble used on the floor, we need to set the ensemble's "Rays" options. Just like the floor we set the Photon Map 'Shading Model' to Glass. NOTE: It is important to explain at this point that the color or
"tint" applied to the photons can be controlled at a number of points
in this example. The first place you can effect them is in the light shader
itself. In the "Caustic Effects" section of the "SpotLight"
shader you will see "Caustic Tint." This controls the tint of the
photons when they are emitted from the light.
|
|
|
9 - Estimator |
|
|
The "Estimator" controls how many
photons are used to compute the caustic color/intensity. Higher numbers will
result in blurrier effects with less visible noise. It is good to experiment
with this to get a good handle on how this will effect the look of caustics in
your final image. 50 is a good starting place while -1 will use the RenderMan
defaults.
Each surface has an Estimator value associated with it. The Estimator value is inherited from the RenderMan Globals, but can also be overridden on a per Ensemble basis.
|
|
|
10 - Stop! You're done. |
|
|
In PRMan v11.0 we do not support the running of the actual shading model for
effects like this, we simply run the shading model stand in for Photon Maps (as
you selected in your ensembles above). This additional feature (the ability
to select 'shade' and run the actual shading model for a surface) will become available in the next release.
Now attach all the shaders to the geometry in your scene and render! |
|
|
|
|
|
Pixar Animation Studios
|
 Did
Somebody Say Caustics?
Did
Somebody Say Caustics?