|
Now here's the trick . . .
The light shader will now generate a shadow map from whatever
light it is attached to. But we must now tell this light shader to use
the shadow map it has created.
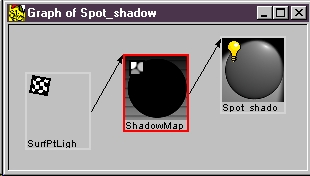
Under the shadowname parameter the name of the shadow
map must be entered. To do this, click on the colored texture button
(the yellow, blue, purple, and green button in the image on the right). A pull-down menu
will appear. Select:
Refer
to-> Shadow
Text should now appear in the field identical to the text
on the right [shdmap $OBJNAME].
(In the section Using the Slim Interface,
you can find out more about referencing shadow maps: The
Reference Texture Menu.)
|
.
.
. This parameter is crucial.
It gets this entire section here.
|
4 - Render and adjust the shadow
|
-
When the new image renders, the ladder has a shadow.
-
In the keyLight appearance editor, there are a number of basic
shadow controls to adjust: shadow color, blur, etc. Clicking the info "i"
buttons will reveal some helpful information.
-
Also note that the shading rate has an enormous effect on
shadow quality. Shading rate is controlled from the "Quality" tab of the
RenderMan Globals.
-
RenderMan-> RenderMan Globals
-
A shading rate of "1" will create good looking
shadows, a lower quality setting of "5" will create shadows that seem "chunky."
|

A shadow with a blur of "8."
.
Shading Rate has a big effect on shadows
|
Conclusion
|
|
And that's how shadows are created. In this example
a
MTOR Spot Light was used to create the shadow. In practice, there are several
ways to create shadows, but remember that in every case a shadow map must
first be enabled and then the shader must be set to refer to it.
The next couple steps will show a couple of techniques
that will make working with maps a little easier.
|
|
Tips and tricks for working with
shadow maps.
Note A -
Viewing Shadow Maps #1
|
- Next we'll take a look at the shadow map, but first
MTOR must be told to keep the shadow map on disk. By default, shadow maps
are "cleaned up" after every job, to keep the maps from cluttering up the
directory. In this case, however, it is desirable to keep the shadow maps.
To do this, open the RenderMan Globals.
-
RenderMan-> RenderMan Globals
-
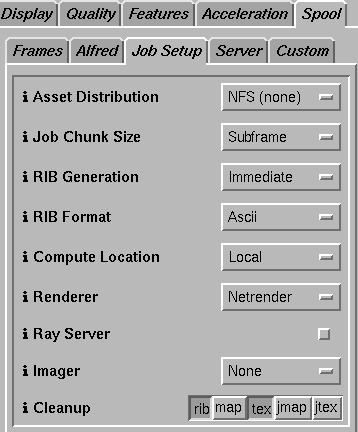
Open the "Spool/Job Setup" tab of the RenderMan
globals. Notice the "Cleanup" parameter on the panel on the
right. Since we want to keep the maps, click on the "map"
button so it is raised, like it is on the right. Now shadow maps will remain.
|
|
Note A - Viewing Shadow Maps
#2
|
-
Render again, and this time the shadow map will not be cleaned up
after the render job is over.
After the shadow map is generated, go to a command prompt.
The shadow maps are placed in the current Maya project directory, inside
a directory created by MTOR called rmantex/shd/
-
This is the area where shadow maps are stored. There should
be a file there called:
-
ladder.keyShape.shd.0001.tex
-
Now type at the prompt:
-
sho ladder.keyShape.shd.0001.tex
An image similar to the one on the right will be displayed
in it. There is much valuable information to be gleaned from map.
The cone angle is used to define the area of the
shadow map, and this is important because shadows of objects can only be
as detailed as the pixels it is created from in the shadow map.
So a couple basic things to remember when generating shadow
maps:
1) Tighten the cone angle of a light to frame objects that cast shadows.
2) Set the map resolution to the required resolution.
In the shadow map on the right, note that most of the
objects in the scene which won't be casting shadows, like the floor, have
had their "Cast Shadows" attributes purposely turned off, which makes the
shadow map more efficient.
|

The Shadow Map
|
Note B - Reusing Shadow Maps
|
-
Once a map is saved, it can be reused. This means shaders
can be adjusted and the scene can be rerendered, but a shadow map doesn't
need to be generated every time. This can speed up workflow quite a bit.
-
The reused shadow will be correct and true as long as the
light isn't moved, the coneangle isn't changed, and all the shadowing objects
remain in the same place.
-
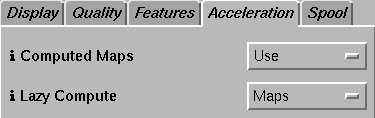
To reuse shadow maps, ensure that map cleanup is off, like
has been done above. Now we need to tell MTOR to reuse maps. Open the "Acceleration"
tab of the RenderMan Globals, as seen in the image on the right. Change
the "Lazy Compute" setting from "Off" to "Maps".
Now the shadow map will be reused until "Lazy Compute" is
turned off.
-
In the image on the right, this technique is emphasized by
deleting the ladder and reusing a previous shadow map. The effect is a
shadow of a ladder cast where there is no longer any ladder. Now to update
the shadow maps correctly we'd just turn "Lazy Compute" off.
-
So reusing maps can speed things up, but don't leave them
on by accident.
|

|
Note C -
Monitoring shadow generation
|
-
Now take a quick look in Alfred and see what happens when a shadow
map is created. First, start a render. The Alfred render queue should open.
Next click on the black triangle by to the render in the queue, that render's
job window will open.
-
Looking in the job window, the boxes represent different
tasks of the render. The empty boxes represent finished tasks, the green
boxes are in progress, and the solid boxes are yet to be worked on.
-
Job window #1 is a single frame job with no maps being generated.
The green box is the final image being rendered.
-
In job window #2, the same scene is rendered, but now an additional
shadow map is being created. This map is actually displayed now in job
window #2. The green box is showing the progress of the shadow map. If
you're successfully generating a shadow map, your job should look like
window #2.
The Alfred job window gives a quick and clear overview
about what is going on in a render job. It can be very helpful when working
with larger, complicated scenes.
|

The Alfred Render Queue
.

Job Window #1
Without shadow map
.

Job Window #2
With a shadow map
|
Note D - Building shadows into Slim Shader Networks
|
|
It's easy to build shadows into Slim shading networks. Once it is built into
the network, you can control them with the methods outlined above. To see how
this is done read through the Shadow
recipe under Shader
Design section.
|
|
Note E - Sharing Maps Between
Lights
|
|
A great feature of using computed maps is that these maps can be shared with
other lights. Let's say the lighting in a scene is perfect, except for the
shadow, it's in the way. It can be moved, by having that light cast a shadow
generated from the position of another light. In this case, one light casts
light and a shadow while the other casts no light, but generates a shadow. For
more information on how to do this look here: Placing Shadows Using Shadow Cameras
|
|
Further Reading
|
|
You may find yourself using computed maps quite a bit. They can be used to
create shadows, reflections, reference images, depth maps, and more. In practice
the use computed maps is straight forward. You can read more about computed maps
under the Shader
Concepts section. Application Note #15
has more information about shadows.
|
|
Next:
|
|
Learn how to create soft shadows, which simulate a diffuse light source.
Now save this file and use it in the next
tutorial. |
|


