Introduction
- Creating a Reflection
|
In PRMan, reflections are generally simulated
through the use of maps. Maps can often be used to simulate reflections more
quickly and efficiently than the alternative of raytracing, especially
for large, complicated scenes.
Reflections are simulated in PRMan by generating "mirrored"
image maps from reflection cameras. When properly set up, the resulting
reflections, while not physically accurate, are usually quite convincing
to the human eye. MTOR makes the process of setting up reflections fairly
trivial, and once the process is understood it is straightforward.
PRMan uses two different types of maps to generate reflections:
reflection maps & environment maps. The appropriate type of map is
determined by what kind of object it will be attached to. For flat surfaces,
a reflection map is used. For objects with volume, like spheres and cubes,
an environment map is used.
In this lesson we'll set up reflections using both a reflection
map and an environment map.
|
1 - Open the file
|
-
For this tutorial, follow along with the Maya scene:
-
mtor/scenes/mirror-reflections/
-
mirror.ma
-
In this scene, we'll set up reflections using Slim.
-
First, we'll add a reflection to the mirror, using a reflection map.
-
Second, we'll add an environment map to the metal rock on the table.
|
Open the scene, mirror.ma
|
2 - Render the File
|
-
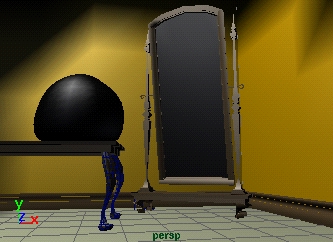
For the sake of comparison, render the scene to see what it looks like
without reflections.
|
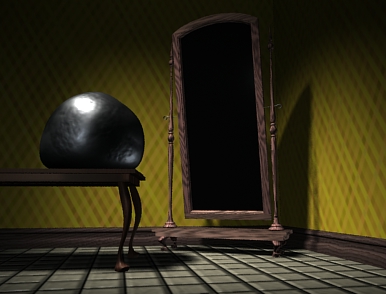
-
The scene has no reflections.
|
Reflection Maps create reflections
on flat surfaces, like a floor or a wall..
3 - Importing a Reflection Map
Shader
|
-
First we'll create a reflection map.
To add a reflections, we'll import a shader by choosing, from a Slim palette:
-
File-> Import Appearance
-
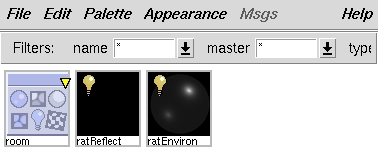
The file picker will open. Go to the "RAT Shaders" directory (On
NT, this directory is located under the "Go to:" menu. On SGI, this
directory is listed under the folder presets at the top of the file picker.).
-
When the "RAT Shaders" directory is open, import "ratReflection.slo".
-
Your palette should look similar to the one on the right.
-
|
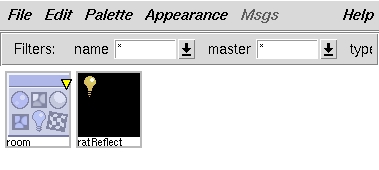
External Slim palette with "ratRefelction.slo".
|
4 - Enable the
Reflection Map
|
- Open ratReflection in the appearance editor, and
expand the "make reflection map" collection.
-
a) Change "Frequency" from "Never" to "EveryFrame."
This will compute a reflection map for each frame.
-
b) For "Objects in Map" enter "mirror1". Later,
we'll create a Maya set named "mirror1" to define what objects will
appear in the reflection.
-
c) For "Reflection" we need to make sure the shader refers
to the reflection map. To do this, click on the blue and purple Texture
button and select:
-
Refer to-> Reflection
- Next, attach the ratReflection shader to the mirror surface.
-
|
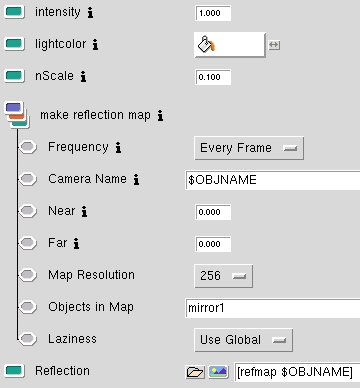
RatReflection displayed in the appearance editor.
|
5 - Defining the Objects for the
Reflection
|
For a reflection to work correctly, it is crucial to
define which objects will appear in the reflection. We can define those
objects using a Maya set.
-
Important: The trick is that we only want the objects
in
front of the reflecting surface to appear in the reflection. You will
get incorrect reflections if objects behind the mirror (or the mirror itself)
are set to appear in the reflection.
-
To define the correct objects for this case, select all of
the objects in the scene . . . except for the walls and the mirror
surface, as is shown in the image on the right.
-
Now create a new set named "mirror1":
-
Edit-> Sets-> Create Set [Option Box]
|

Create a set for the reflecting objects.
|
6 - Rendering the
Reflection Map
|
|
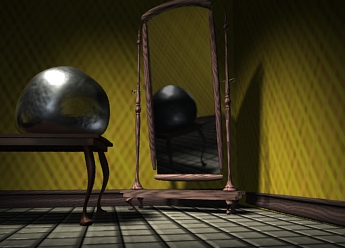
Now try rendering the scene.
RenderMan-> Render
The rendered image should look like something on the right.
|
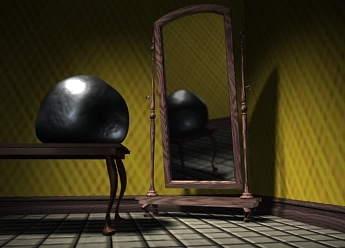
The mirror with a reflection.
|
Creating
an Environment Map
Environment Maps create reflections
on objects with volume, like a sphere.
7 - Import an Environment Map
|
|
From the same place that we imported ratReflection, now import
the shader called ratEnvironment.
Your palette should look somewhat like the image on the right.
|
Import the ratEnvironment
|
8 - Enable the
Environment Map
|
-
This step is very similar to enabling the reflection map.
First, open ratEnvironment in the appearance editor, and
expand the collection, "make reflection map."
- a) Change "Frequency" from "Never" to "EveryFrame."
This will compute an environment map for each frame.
-
b) For "Objects in Map" enter "rock1". As we
did above, we'll create a Maya set to define what objects will appear in
the reflection.
-
c) For "Picture" we need to make sure the shader refers
to the environment map. To do this, click on the blue and purple Texture
button and select:
-
Refer to-> Environment
d) Also, for the sake of speed, lower "Map Resolution"
to 128.
Now, attach the ratEnvironment shader to the rock object
on the table.
|
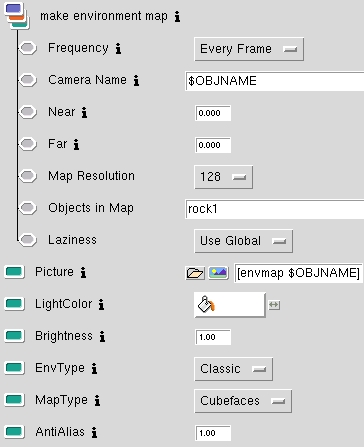
ratEnvironment in the appearance editor
|
9 - Define Objects for the Environment Map
|
|
As described above, create a Maya set named "rock1",
but in this case, the Maya set should include all the objects in the scene,
except
the rock itself.
The environment map will use images generated from inside
the rock, and if the rock is included in the reflection set, then the environment
map will be the dark insides of a rock.
|
|
10 - Rendering the environment
map
|
|
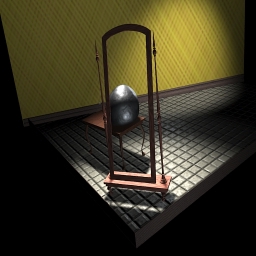
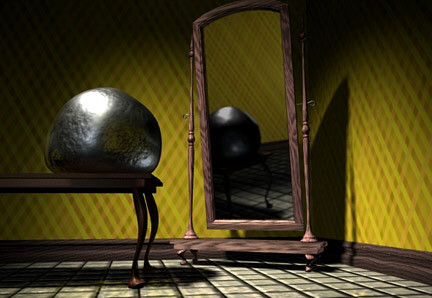
Now try and render the scene.
RenderMan-> Render
The rendered image should look like something on the right.
|
The rock with a reflection
|
Reflection
Notes - Tips and Tricks
Tips and tricks for working with
reflections.
|
Note A - View the reflection map
|
|
You can view the reflection map using the same technique used to view
shadow maps. (Review technique.)
Note that the files generated for reflections are put in a different
project directory than shadows:
/rmantex/env
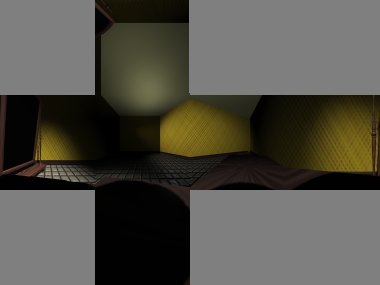
In the reflection map on the right, it is easier to see how important
it is to select the correct objects to appear in reflections. If the back
walls or the mirror were visible in this reflection map, it would create
a strange reflection.
|
A view of the reflection map,
frame.mirrorShape4.ref.0001.tex
|
Note B - View the environment map
|
|
You can view the environment map using the same technique
used to view shadow maps. (Review
technique.)
Again, files generated for reflections are put in a different project
directory than shadows: /rmantex/env/
Here we can see that an environment map is composed of
six different images, all knitted together. It can take a long time to
compute six image maps, and that's why it will always speed things up to
use the lowest "Map Resolution" that is acceptable.
|
The Environment Map,
frame.rockShape.env.0001.tex
|
Note C -
Reusing Reflections
|
-
Much time can be gained be reusing reflection maps. In this
case, reflection maps are saved to disk, and do not have to be recalculated
for each job.
-
To reuse reflections, ensure that map cleanup is off. To turn
map cleanup off, open the "Job Setup" tab of the RenderMan
Globals, and turn map cleanup off by clicking on "map" so
it is raised, like the image on the right.
-
Now we need to tell MTOR to reuse maps. Open the "Acceleration"
tab of the RenderMan Globals, as seen in the image on the right. Change
the "Lazy Compute" setting from "Off" to "Maps".
Now the reflections will be reused until "Lazy Compute" is
turned off.
|
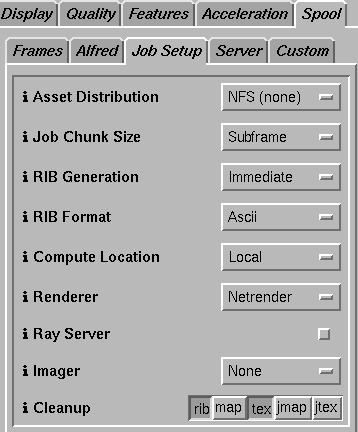
The Job Setup Tab
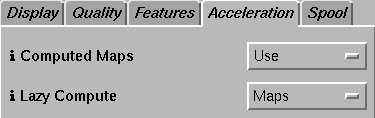
The Acceleration Tab
|

 You can also build reflection effects into Slim shading networks.
Once a reflection is built into the network, you can control them with
the methods outlined above. To go through the process step by step
read through the
You can also build reflection effects into Slim shading networks.
Once a reflection is built into the network, you can control them with
the methods outlined above. To go through the process step by step
read through the