|
||||||||||||||||||||||||||||
|
1- Make a Palette Start Maya and make sure that MTOR is properly loaded. Now create a palette in Maya |
|
|
|
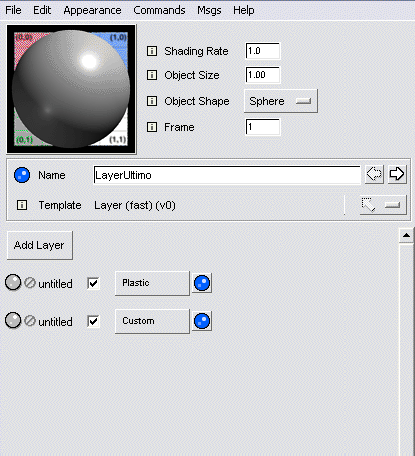
2- Create a Layered Shader Now create
a layered shader (for this exercise we will be using Layer Ultimo):
|
 |
3- Add a Layer The layer window.
A) Press the button marked by the large black "A"
in the image. A list will appear. Pick the “Delux” shading
model.
|
 |
4- Render The Swatch The layer is now connected to a Delux. Render the swatch (the empty square), by clicking on it, and see how the shader looks… For the next step, #5, open the Delux in the window by pressing the Delux button (marked by the large black "A" in the image)… |
 |
5- Basic Hierarchy Navigation This is the Delux shading model. It is very versatile, as different surface characteristics (called shading components) can be added here to create a variety of surfaces. We'll now move back up in the hierarchy. A) These arrows (marked by the "A") allow you to open appearances that were previously open, kind of like a web browser. The diagonal arrow opens whatever is directly above in the shader hierarchy, as opposed to moving back to the most recent window. Press the left arrow to go back to the top node, the layered shading model.
|
 |
6- Add a New Layer Back at the top of the hierarchy, add another layer (Press the "Add Layer" button). Now add a “Plastic” shading model to the new layer by clicking on the blue ball shader button, in the same way we connected the “Delux” above. After creating the connection, render the swatch. The new Plastic layer covers the Delux. In the next step we'll add a new connection to the Plastic. Open the Plastic in the window (press the “Plastic” button). |
 |
7- Adding a Color Function We've just opened the Plastic shading model. Now we'll add a connection, a ColorRamp, to the Plastic's Opacity, and create a layered shader. A) To establish a connection, click and hold down the
connection widget, Next, open the ColorRamp connection (click on the ColorRamp button). |
 |
8- Tweaking the Ramp You should have the ColorRamp open. Follow these steps:
Now open the manifold (press the ST button). |
 |
10- Adjusting Repeats The ST manifold. A) Adjust the T Repeats so that the stripes repeat twice. You can do this with the slider or by entering the number “2” in the appropriate field (i.e. the box to the right of “T Repeats”). Using the white arrows, move back up to the Plastic shading model. (Alternatively, if you have your Layer node expanded — click on the yellow arrow in the upper right hand corner of the icon, you can double-click Plastic in the palette.) |
 |
11- Adding a Float Function Your Plastic should be open now. Render the swatch, and notice how the transparency of the Plastic has been changed. Next we'll change the surface color and add a connection to the Intensity parameter. Click on the lavendar triangle next to the words "Diffuse Illumination" to view the parameters.
Now render the swatch to see how the Worley affects the diffuse value. Using the arrows, or palette, go back to the top of the shading network hierarchy. |
 |
12- The Layered Shader Navigate back to the top of the hierarchy, and render the swatch; a layered image similar to the one on the right should appear. Congratulations, that's it! |

|
13 - Creating Shading Components
The Delux shading model is powerful because different surface charateristics (called shading components) can be added to the base Delux model. These additional components can be: specular, rim light, subsurface scattering, etc. Back in our Layer shader, open up the Delux layer and we'll throw in a couple of tweaks.
Now our once diffuse model has specular highlights and rim lighting built directly into it! Delux is a powerful tool that allows you to build the exact shader characteristics you need into any given surface. |
|
|
14 - View the call graph. In the palette, right-click on the Layer node. You'll see a pull-down menu appear. Select: Call Graph -> Graph Children The Graph Editor can be used to view, edit, and create shading networks and connections. (For more information about the graph editor see: The Graph View Editor, located in the Using the Slim Interface section.)
|
|
Some key concepts covered here include: Slim's Core Functions Shader Design Take some time experimenting with the Slim, search for more info on specific questions in the documentation, take the RAT Crash Courses, or start the tutorials. For more information refer to : |
|
|
Pixar Animation Studios
|

